ControlNet is a group of neural networks that can control the artistic and structural aspects of image generation. The popular ControlNet models include canny, scribble, depth, openpose, IPAdapter, tile, etc. They give you more controls over images in addition to prompts. This post provides step-by-step guide on how to install and use ControlNet models in Stable Diffusion Webui.
Stable diffusion webui, ( AUTOMATIC1111), is a browser interface for Stable Diffusion. It provides many features, such as text-to-image, image-to-image, inpainting, outpainting, upscale etc.
ControlNet is a neural network working with Stable Diffusion to control diffusion models by adding extra conditions. The detailed info can be found at Github ControlNet.
1. Canny: Reproduce an image by the outline.
2. Scribble: Sketch-to-Image.
3. Open Pose: Pose control.
4. Depth: Create a backdrop of the scene.
5. IP-Adapter: Apply styles from a reference image.
6. Inpaint: Outpaint an image.
7. Tile: Upscale an image.
8. TemporalNet: cartoonize a video.
Table of Content
- Pre: Install Stable Diffusion Webui on Windows
- 1. Setup ControlNet, test with Canny
- 2. Sketch to Image with Scribble
- 3. Pose Control with OpenPose
- 4. Create a backdrop with Depth
- 5. Apply Styles with IP-Adapter
- 6. Outpainting with Inpaint
- 7. Upscale with Tile
- 8. Cartoonize a video with TemporalNet
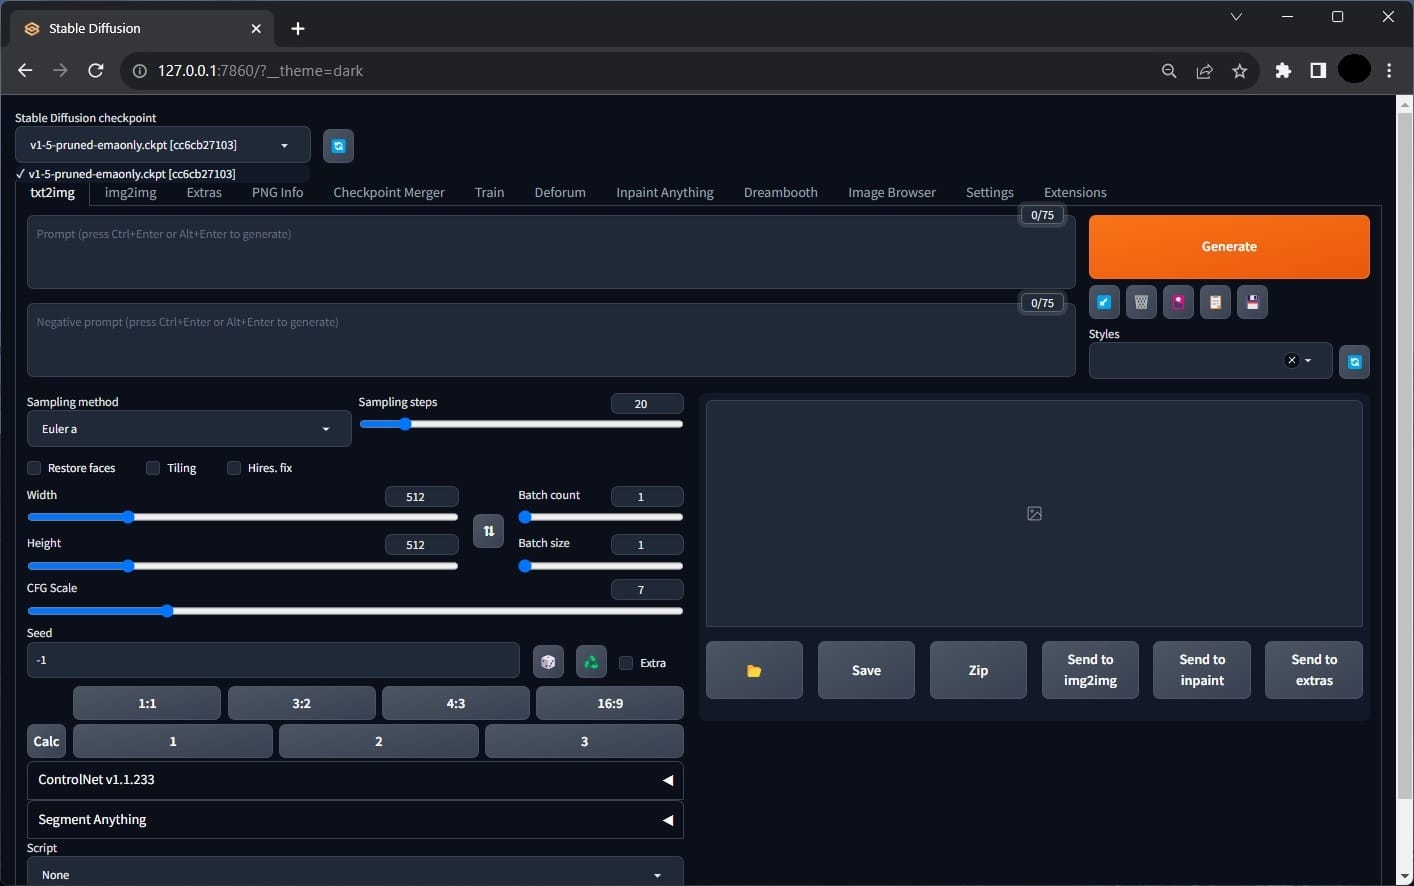
Prerequisite: Install Stable Diffusion Webui on Windows
1. Go to python to download the latest version and install. When you run the installer, remember to check “Add python to the path.”
2. Go to download git for windows. Select “64-bit Git for Windows Setup.” Run the installer.
3. Create a new directory on your local drive, say a1111. In this directory, run cmd:
>git clone https://github.com/AUTOMATIC1111/stable-diffusion-webui.git
It will create a “stable-diffusion-webui” directory.
4. In this directory, use text editor to open webui-user.bat. Add parameters for COMMANDLINE_ARGS . For example,
COMMANDLINE_ARGS =--xformers --medvram --autolaunch --theme dark
5. Download models from Huggingface and civitai. For example, go to stable-diffuion-xl-base-1.0. Download “sd_xl_base_1.0.safetensors“ file. Copy this file to your “stable-diffusion-webui\models\Stable-diffusion” directory.
6. Run “stable-diffusion-webui\webui-user.bat” file. A console window will show the status, such as downloading torch, torchvision and other packages. After a few minutes, the Stable Diffusion Webui runs in your browser. The default url is http://127.0.0.1:7860/.
1. Setup ControlNet, test with Canny
1. Run “stable-diffusion-webui/webui-user.bat” to open a Stable Diffusion Webui in browser at http://127.0.0.1:7860/.
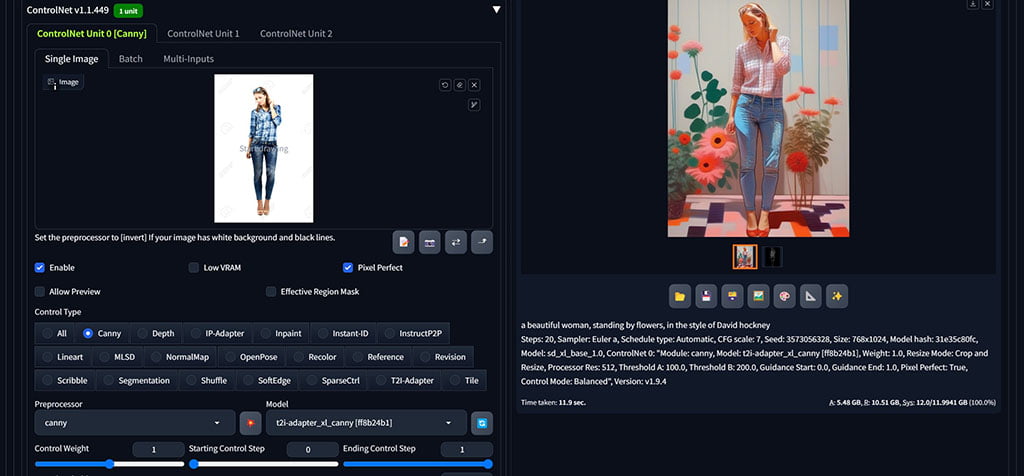
2. Click the Extensions tab at the top. Search for ControlNet. Select sd-webui-controlnet and click the Install.
3. Go to sd_controlnet_collection to download a canny model, for example “t2i-adapter_xl_canny.safetensors.” Put it in the “stable-diffusion-webui\extensions\sd-webui-controlnet\models” directory.
4. Close your Webui console and browser. Rerun the Webui. You will see a new ControlNet section at the left bottom area of the screen. Now we test it.
5. In the Stable Diffusion checkpoint at the top, select a model from the dropdown. In the txt2img tab, enter your prompt. Expand the ControlNet section, drag your reference image inside the ControlNet first single image. Check the “Enable” checkbox.
6. In the Control Type, check “Canny.” The Preprocessor will fill with “Canny”. In the Model, select “t2i-adapter_xl_canny.safetensors.”
7. Click the Generate button, you will see the output image is influenced by the input image in ControlNet.
2. Sketch to Image with Scribble
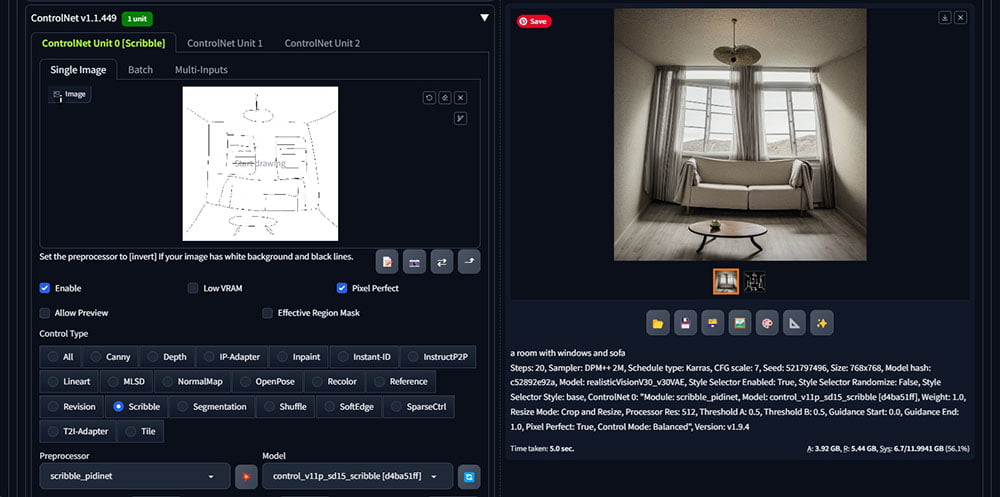
1. Go to ControlNet -v1-1 to download “control_v11p_sd15_scribble.pth” and put it in the “extensions\sd-webui-controlnet\models” directory.
2. Draw a simple sketch for your image.
3. Run “stable-diffusion-webui/webui-user.bat” to open a Stable Diffusion Webui in browser at http://127.0.0.1:7860/. Select a Stable Diffusion checkpoint in the drop down.
4. In the txt2img tab, enter your prompt to describe your image. Most settings can be default. If the checkpoint is sdxl, increase the Width and Height to 768 or above. The ratio is the same as the input sketch.
5. Expand the ControlNet section. Drag your drawing to the first Single Image. Check the “Enable” checkbox.
6. In the Control Type, select “Scribble.” The Preprocessor will fill with “scribble_pidinet”, In the Model dropdown, select “control_v11p_sd15_scribble.”
7. Click the Generate button. An image is generated following your sketch.
Tip: If the generated image don’t follow the input sketch, you can try these two things: (1) Check the console to see if there are errors due to conflicts. If there are, change to another checkpoint and try again. (2) Close and restart Webui to clear the cached data.
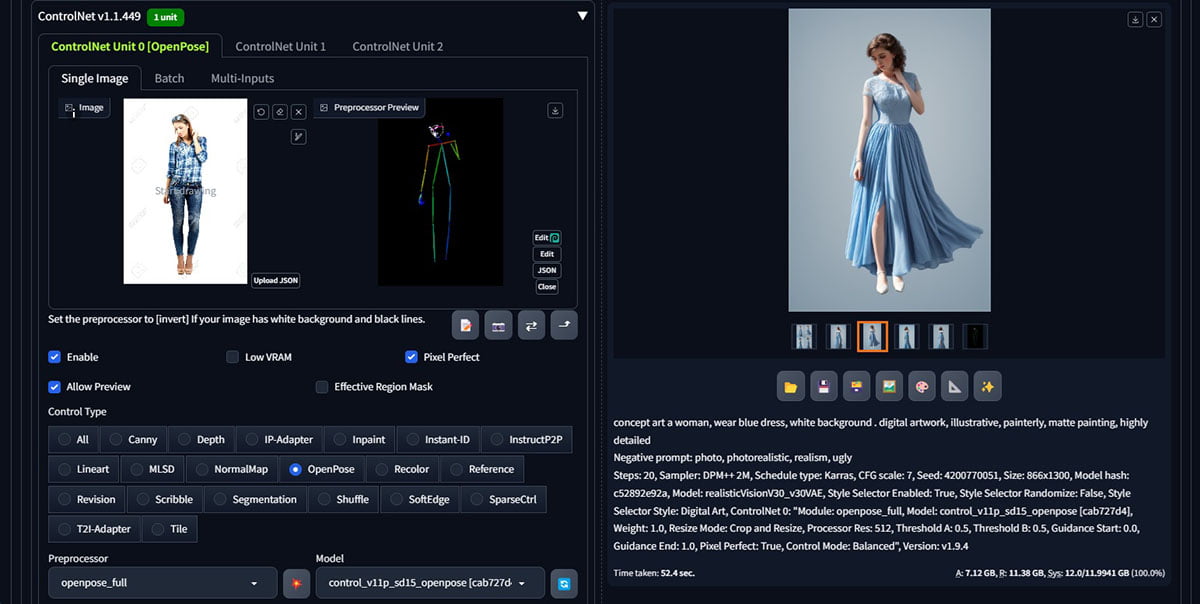
3. Pose control with OpenPose
1. Go to ControlNet -v1-1 to download “control_v11p_sd15_openpose.pth” and put it in the “extensions\sd-webui-controlnet\models” directory.
2. Run “webui-user.bat” to open a Stable Diffusion Webui.
3. In the txt2img tab, enter your prompt. The Width and Height keep the same ratio as the input image.
4. Expand the ControlNet area. Load an image with the pose you want. Check “Enabled” and “Pixel Perfect” underneath.
5. Select the Control Type to be “OpenPose”. Set the Preprocessor to be “openpose_full”. Set the Model to be “control_V11p_se15_openpose”.
6. Click the fire icon next to the Preprocessor, it will generate an OpenPose image in the preview. You can download it for later use.
7. Click the Generate button. An image with the same pose will be generated.
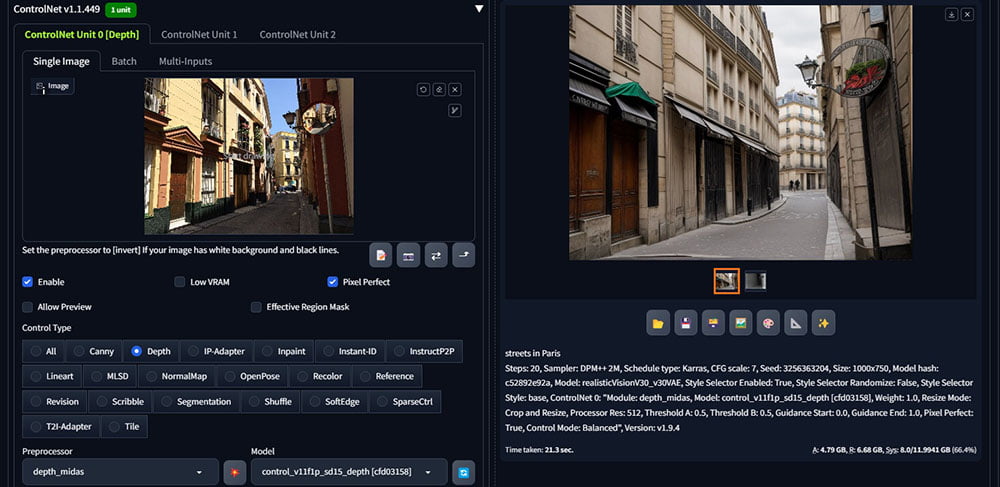
4. Create a backdrop with Depth
1. Go to ControlNet -v1-1 to download “control_v11f1p_sd15_depth.pth” and put it in the “extensions\sd-webui-controlnet\models” directory.
2. On internet, search for an image that has similar depth to the image you want to generate.
3. Run “stable-diffusion-webui/webui-user.bat” to open a Stable Diffusion Webui in browser at http://127.0.0.1:7860/.
4. Select a Stable Diffusion checkpoint in the drop down. In the txt2img tab, enter your prompt to describe your image. Set the Width and Height around 768 ~1024 if you are using a sdxl checkpoint. Set the image ratio the same an the input image. Other settings can be default.
5. Expand the ControlNet section. Drag your image to the first Single Image. Check “Enable”.
6. In the ControlType, select “Depth.” The Preprocessor will fill with “depth_midas”, In the Model dropdown, select “control_v11f1p_sd15_depth.”
7. Click the Generate button. A image will be generated with the same depth as your input image. It can be used as a backdrop of a scene.
5. Apply Styles with IP-Apdapter
1. Go to IP-Adapter to download ip-adapter models, such as “ip-adpater-sd15.bin” or “ip-adapter-sd15.safetensors” and put them in the directory “extensions\sd-webui-controlnet\models.”
2 Run “stable-diffusion-webui/webui-user.bat” to open a Stable Diffusion Webui in browser at http://127.0.0.1:7860/.
3 Select a Stable Diffusion checkpoint in the drop down. In the txt2img tab, enter your prompt to describe your image. Set the Width and Height around 768 ~1024 if you are using a sdxl checkpoint. Other settings can be default.
4. Expand the ControlNet section. Drag a image with the style your like to the first Single Image. Check “Enable”.
5. In the ControlType, select “IP-Adapter.” In the Preprocessor, select “ip-adapter_clip_h”, In the Model dropdown, select “ip-adapter_sd15.”
6. Click the Generate button. An image with the similar style will be generated.

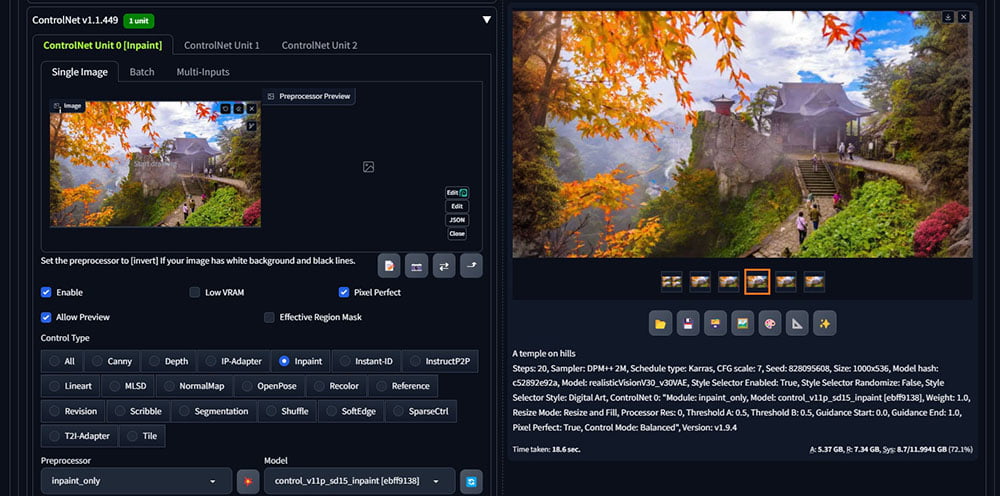
6. Outpainting with Inpaint
1. Go to ControlNet -v1-1 to download “control_v11p_sd15_inpaint.pth” and put it in the directory “extensions\sd-webui-controlnet\models.”
2. Run “webui-user.bat” to open a Stable Diffusion Webui in the browser at http://127.0.0.1:7860/.
3. Select a Stable Diffusion checkpoint in the drop down. In the txt2img tab, enter your prompt to describe the image you want. Set the Batch count to be “4”.
4. In the ControlNet section, drag the image you want to outpaint in the Single Image area. Check the “Enable” underneath. Select the Control Type to “Inpaint”. This will change the Preprocessor to “inpaint_only” and the Model to “control_v11p_sd15_inpaint”.
5. (Important) Find the width and height of the original image. Increase either width or height (not both) at a time. In the ControlNet area, check the Resize Mode to “resize and fill”.
6. Click the Generation button.
7. After images are generated, drag a good output image to your ControlNet as a new baseline to continue. Increase Width or Height and click the Generate button.
8. Repeat the process until you have your ideal image.
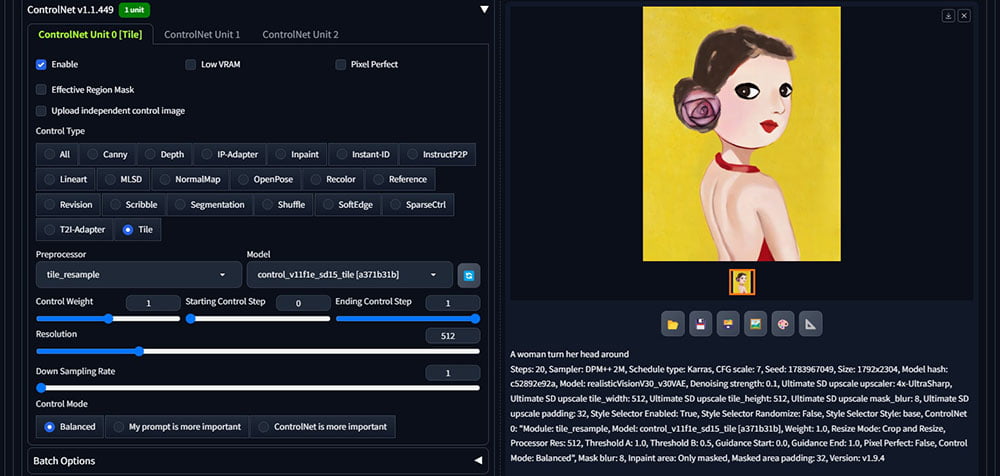
7. Upscale with Tile
1. Open a Stable Diffusion Webui, click the Extensions tab, and click the Load From. Search for Ultimate SD upscale, and click the Install.
2. Go to ControlNet-v1-1 to download a tile model, i.e “controlnet_v11f1e_sd15_tile.pth.” Put it in the “extensions\sd-webui-controlnet\models” directory.
3. Go to mega site to download “4x-UltraShap.pth.” Put it in the “models\ESRGAN” directory.
4. Restart the Webui. Select a Stable Diffusion checkpoint in the drop down. In the img2img tab, load an image you want to upscale, write a prompt to describe the image. Decrease the denoising strength to around 0.1.
5. Expand the ControlNet area. Check “Enable”. Select “Tile” in the Control Type. In the Preprocessor, select “tile_resample. ” In the Model, select “control_v11f1e_sd15_tile”.
6. In the Script dropdown, select “Ultimate SD upscale”. For the Target size type, select “Scale from image size”. Change the Scale to 2 ~ 6.
7. In the Upscaler, check “4x-UltraShap”.
8. Click the Generate button. It takes minutes to generate the output image depending on how big you want to upscale.
9. When you zoom in the outcome image, you may see edges of tiling. You can fix with Photoshop blend brush.
8. Cartoonize a video with TemporalNet
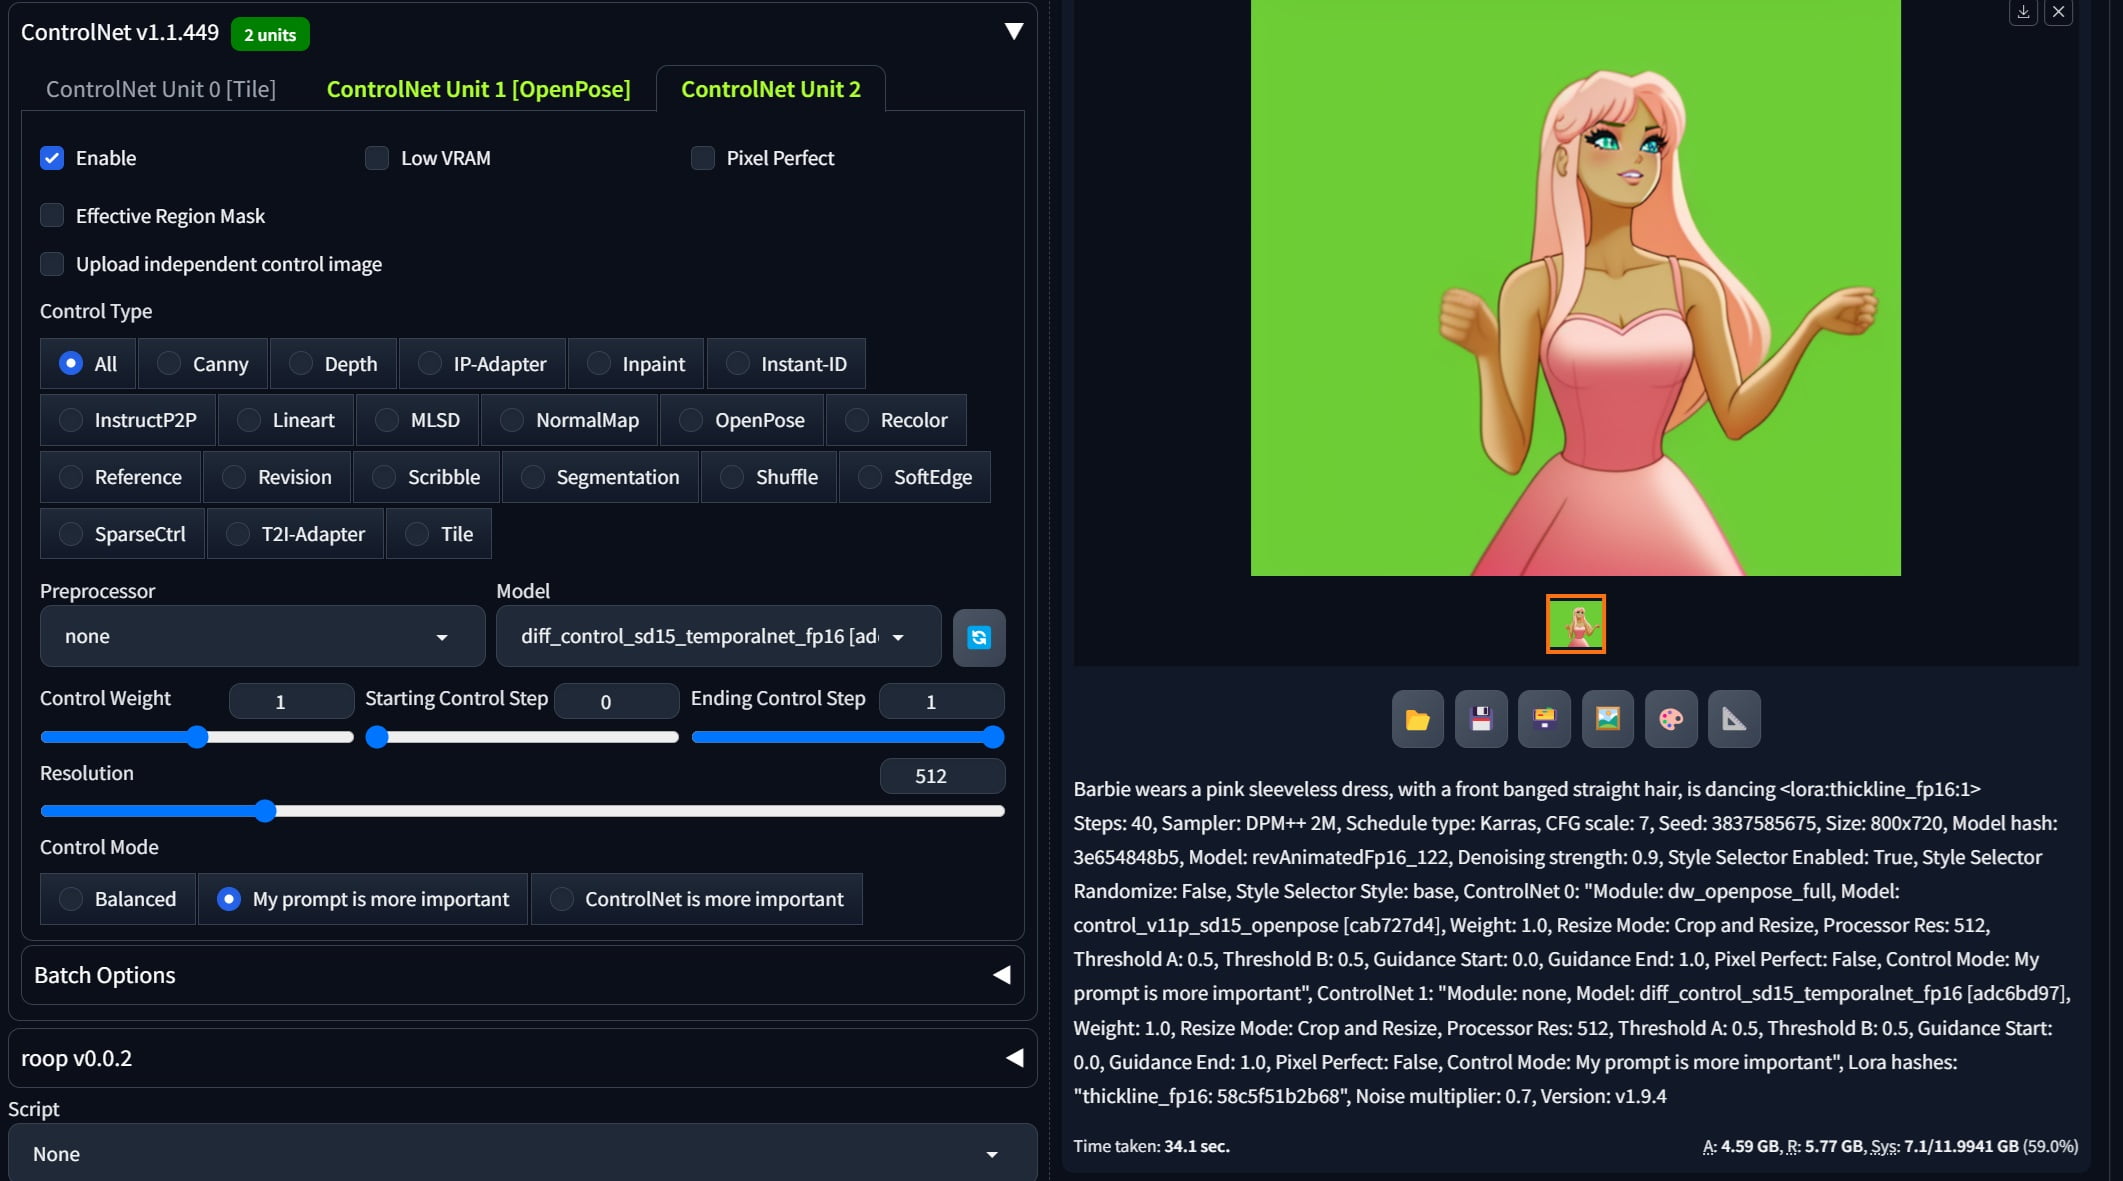
1. Go to TemporalNet to download “diff_control_sd15_temporalnet_fp16.safetensors” and “cldm_v15.yaml.” Rename “cldm_v15.yaml” to “diff_control_sd15_temporalnet_fp16.yaml.” Put these two files in the “extensions\sd-webui-controlnet\models” directory. TemporalNet is one of ControlNet models that enhances the consistency of generated images and reduce flickering.
2. Prepare a video witch a character is dancing or actioning. If the video doesn’t have a green screen as background, remove the background with software tools and fill background with a green screen. Render it as an image sequence and put them in one directory.
3. Run “webui-user.bat” to open a Stable Diffusion Webui. Click the Settings tab. Select the “User Interface” from the left menu. At [Info] Quicksettings list, add “initial_noise_multiplier.” Select the “ControlNet” from the left menu, check “Do not append detectmap to output.” Click the Apply settings and Reload UI buttons.
4. After you reload the webui, you can see a new field “Noise multiplier for img2img” showing up at the top area. Change the value to around “0.7” .
5. In the Stable Diffusion checkpoint dropdown, select a checkpoint with an anime style, such as “revAnimated.” Click the img2img tab, load the first image in the image sequence inside the area. Enter your prompt to describe the video. Change the Width and Height to the size of your image. Set the CFG Scale to be 7. Set the Denoising strength to be 0.75~0.9 .
6. Expand the ControlNet section. In the ControlNet Unit 0, check “Enable”. In the Control Type, select “OpenPose”. Set the Preprocessor to be “dw_openpose_full”. Set the Model to be “control_v11p_sd15_openpose.” Check “My prompt is more important. ” This will improve the pose and fingers of the character.
7. In the ControlNet Unit 1, check “Enable”. In the Control Type, check “All”. Set the Preprocessor to be “None”, Set the Model to be “diff_control_sd15_temporalnet_fp16”. Check “My prompt is more important.”
8. Click the Generate button to generate one image. Adjust your prompt, noise multiplier, CFG scale and Denoising strength until you are happy with the rendered image. Copy the seed number from the output image to replace “-1” under the Seed field.
9. Under the Generation tab, click the “Batch” tab. Set the Input directory to the path of your image sequence. In the Output directory, set the path to where you want to save the output.
10. Click the Generate button. Monitor the progress in the Anaconda prompt. When it finishes, go to the output directory to check the result.
11. You can continue tuning the prompt, the value of Noise multiplier, CFG Scale, and Denoising strength to suit your needs.
12. When you are happy with the result, import the output image sequence in After Effect or other video editing software to render as a video.
Tip: If the generated image sequence is flicking, you can try these two things: (1) Clean up your video with no objects at background or use greenscreen. (2) Add more detailed descriptions in your prompt to improve the consistency.