ComfyUI is a web-based platform for generating images and videos using Stable Diffusion. It serves as a modular framework that brings together tools like ControlNet, IP-Adapters, and AnimateDiff into a single, cohesive workflow. Users can save and reuse these workflows to perform complex tasks efficiently.
ComfyUI Portable is a standalone Windows build that allows you to run ComfyUI using either an Nvidia GPU or a CPU. It can be downloaded from GitHub and installed directly on your Windows system.
Nodes are the fundamental building blocks of workflows in ComfyUI. In other words, a ComfyUI workflow is made up of interconnected nodes. While some nodes are included by default, you’ll often need to install custom nodes to use specific modules like ControlNet, AnimateDiff, and others.
Table of Content
- Download and Install ComfyUI Portable
- Install ComfyUI-manager and run comfyUI
- Install ControlNet in ComfyUI
- Install IPAdapter in ComfyUI
- Install AnimateDiff in ComfyUI
- Install AnimateDiff-Evolved in ComfyUI
1. Download and Install ComfyUI portable

1. If you don’t have a 7-zip setup, go to the 7-zip site to download an installer. Run the installer. 7-zip will be used to extract the zip file in the next step.
2. Go to the ComfyUI GitHub download page. In the Assets section of the latest release notes, select ComfyUI_windows_portable_nvidia.7z to download. Right-click the downloaded file in your file explorer, and use 7-Zip to extract it. The root directory is “ComfyUI_windows_portable.”
3. Go to “ComfyUI_windows_portable\ComfyUI” subfolder, rename “extra_model_paths.yaml.example” to “extra_model_paths.yaml.” Open a text editor to edit this file. Uncomment the section for ComfyUI. Change base_path to the absolute path of your “ComfyUI_windows_portable\ComfyUI” directory.
2. Install ComfyUI-Manager and run your first workflow
1. Now you install ComfyUI-Manager. It is an extension for you to install or remove various customer nodes and models. On Windows, the easy way is to copy the content of install-manager-for-portable-version.bat. Create a new file with the same name, paste the content you just copied, save the file. Then put this file in “ComfyUI_windows_portable” directory. Double-click to run it. This will add “ComfyUI-Manager” folder at “ComfyUI\custom_nodes” directory.
2. Download Stable Diffusion models from Huggingface and civitai. A Stable Diffusion model, a.k.a a checkpoint is the key to generate the images or videos with the style you desire. For example, to get a style of anime, go to Counterfeit-V3.0. Download “CounterfeitV30_v30.safetensors” file. Copy this file to your “ComfyUI\models\checkpoints” directory.
3. Now let’s run ComfyUI. Under “ComfyUI_windows_portable”, there are two batch files, “run_cpu.bat” and “run_nvidia_gpu.bat.” Select one to run. A console window will show the status of launching. Minute(s) later, ComfyUI runs in your browser. The default URL is http://127.0.0.1:8188/.
4. You can test your installation by running a workflow. A workflow is a json file or a PNG image containing the parameters to generate images or videos in ComfyUI. Go to ComfyUI_examples, and click Img2Img. Drag the screenshot image on that page to your ComfyUI in the browser.
5. In the Load Image node, load an image from your local drive. Note the default input images are located at “ComfyUI\input.” In the Load Checkpoint node, select a checkpoint that available in the checkpoints directory, for example, the “CounterfeitV30_v30.safetensors.”
6. Click the Queue Prompt button at the top of the right panel. The workflow starts to run. Monitor the progress in the ComfyUI console. You can also get the status by looking at the green edge moving around the nodes in ComfyUI interface. If you see a red edge, that means there is an error. Find what the error is in the console and fix it.
7. When the execution finishes, a new image shows at the Save Image node, which is the last node on the right. Right-click the image to save it. The output image is also saved in the “ComfyUI\output” directory automatically. Remember to save your workflow by clicking the Save button in the right panel. Next time you can drag this workflow to ComfyUI to run.
3. Install ControlNet in ComfyUI
ControlNet is a group of neural networks that can control the artistic and structural aspects of image generation. It gives you more controls over images created by Stable Diffusion.
1. Open ComfyUI in a browser at http://127.0.0.1:8188/.
2. Click the Manager button in the right panel. The ComfyUI Manager Menu opens. Click the Customer Nodes Manager button, a window with a list of customer nodes pops up. In this window, search for “controlnet.” Select “ComfyUI’s ControlNet Auxiliary Preprocessors” and click Install.
3. When the installation finishes, click RESTART to restart ComfyUI.
4. Go to ControlNet v1.1 to download ControlNet models, such as “control_v11p_sd15_scribble.pth”, “control_v11p_sd15_openpose.pth,” “control_v11p_sd15_lineart.pth,” “control_v11p_sd15_softedge.pth,” “control_v11f1e_sd15_tile.pth,” etc. Put them at “ComfyUI\models\controlnet” directory.
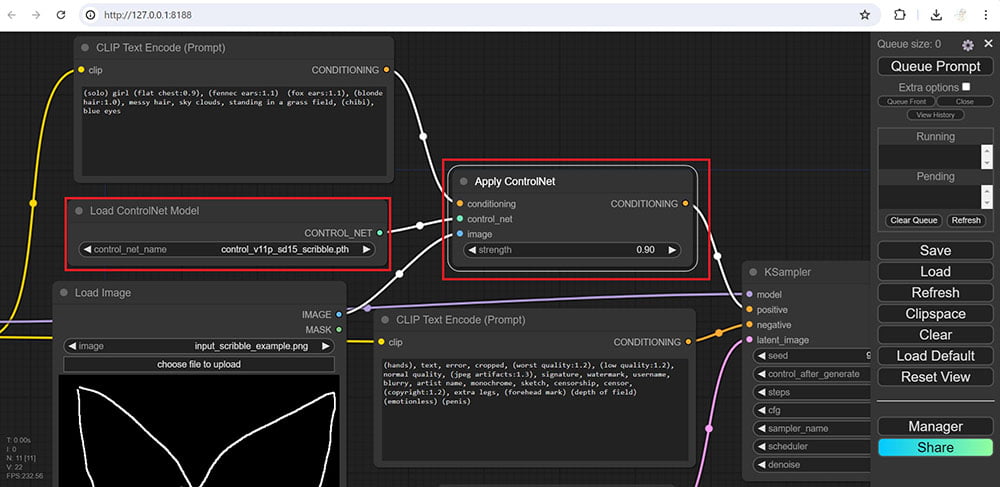
5. To test the installation, go to ComfyUI_examples, and click ControlNet and T2I-Adapter. In this page, there are a few ControlNet examples. Drag the Scribble ControlNet workflow image to your ComfyUI in the browser. Meanwhile, download the scribble image beneath and save it at “ComfyUI\input” directory.
6. Let’s look at the nodes in the workflow. There are two nodes used for ControlNet (See the image above). One is the Load ControlNet Model, the other is the Apply ControlNet. In the Load ControlNet Model node, select “control_v11p_sd15_scribble.pth.” If you don’t see any data from the dropdown, click the Refresh button in the right panel to get the ControlNet models showing up.
7. To run the workflow, in the Load Checkpoint node, select a checkpoint in your “ComfyUI\models\checkpoints” directory, for example, the “CounterfeitV30_v30.safetensors” you downloaded before. In the Load Image node, click the choose file to upload button to load the scribble image you downloaded.
8. Click the Queue Prompt button to run the workflow. Monitor the progress in the ComfyUI console. Note during the run, there are a few annotators downloaded. They are saved in the “ComfyUI\custom_nodes\comfyui_controlnet_aux\ckpts\lllyasviel\Annotators.”
9. When it finishes, a new image shows in the Save Image node. The output image is also saved in the “ComfyUI\output” directory. Remember to save your workflow by clicking the Save button in the right panel.
4. Install IPAdapter in ComfyUI
IP-Adapter, or image prompt adapter, is a stable diffusion add-on to generate images using image prompts. It allows you to apply styles from your reference images.
1. Open ComfyUI in a browser at http://127.0.0.1:8188/.
2. Click the Manager button in the right panel. The ComfyUI Manager Menu opens. Click the Customer Nodes Manager button, a window with a list of customer nodes pops up. In this window, search for “ipadapter.” Select “ComfyUI_IPAsapter_plus” by cubiq and click Install. When the installation finishes, click RESTART to restart ComfyUI.
3. Go to ComfyUI_IPAdapter_plus GitHub page. Scroll down to Installation section. Download CLIP-ViT-H-14-laion2B-s32B-b79K.safetensors and CLIP-ViT-bigG-14-laion2B-39B-b160k.safetensors. Rename the downloaded files to the names shown here. Put them in the “ComfyUI\models\clip_vision” directory.
4. Download ip-adapter_sd15.safetensors and other ip-adapter models listed on the same page. Put them in the “ComfyUI\models\ipadapter” directory.
5.(Optional) If you are going to work on face generation or face fixing, you need to continue to install insightface and download lora models by following the instruction in the installation section.
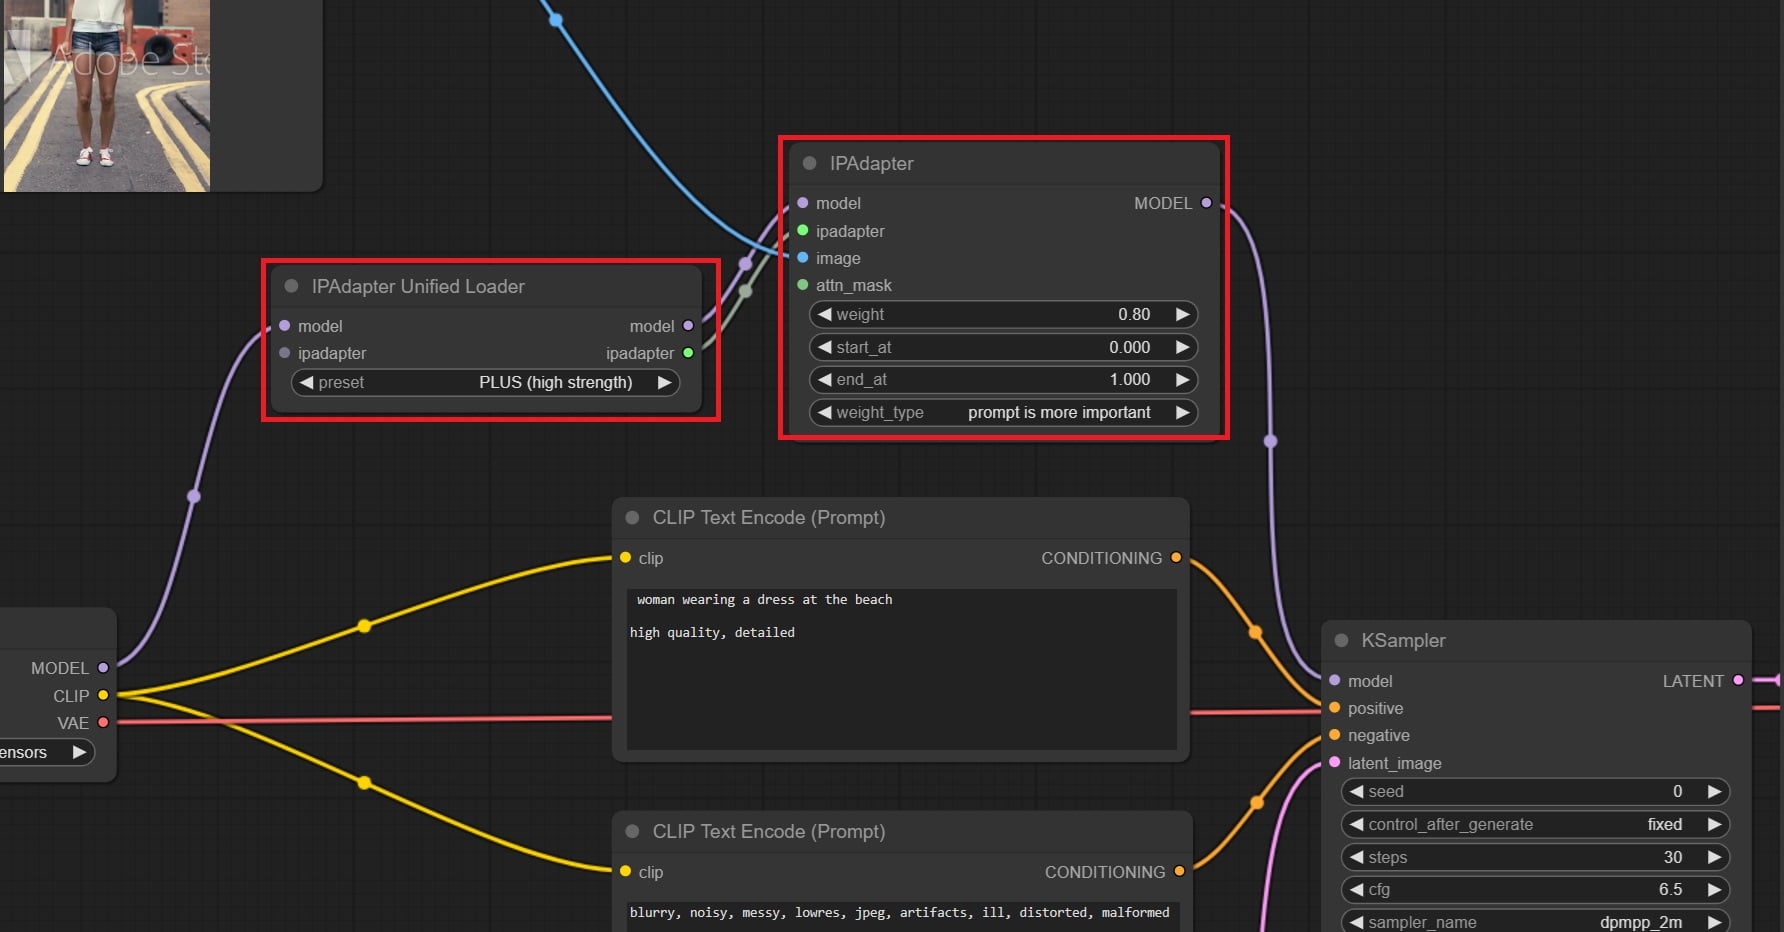
6. To test the installation, go to ipadapter_plus examples. In this page, there are many ipadapter json workflows files. Click ipadapter_simple.json and download it. Drag the file to your ComfyUI in the browser.
7. Let’s look at the nodes in this workflow. There are two nodes used for ipadapter (See the image above). One is the IPAdapter Unified Loader node, the other is the IPAdapter node.
8. To run the workflow, in the Load Checkpoint node, select a checkpoint in your “ComfyUI\models\checkpoints” directory. In the Load Image node, click the Choose file to upload button to load an image. Change the prompt to describe your image.
9. Click the Queue Prompt button to run the workflow. Monitor the progress in the ComfyUI console.
10. When the execution finishes, a new image shows in the Save Image node. The output image is also saved in “ComfyUI\output” directory. Remember to save your workflow by clicking the Save button in the right panel.
5. Install AnimateDiff
AnimateDiff is an AI video generator that uses Stable Diffusion along with motion modules. It provides text-to-image, camera movements, image-to-video, sketch-to-video. Here is the link of AnimateDiff paper.
1. Open ComfyUI in a browser at http://127.0.0.1:8188/.
2. Click the Manager button in the right panel. The ComfyUI Manager Menu opens. Click the Customer Nodes Manager button, a window with a list of customer nodes pops up. In this window, search for “animatediff.” Select “AnimatedDiff” by ArtVentureX and click Install. When the installation finishes, click the RESTART to restart ComfyUI.
3. Go to download animatediff motion models, such as “mm_sd_v15_v2.ckpt,” etc. Put them in the “ComfyUI\custom_nodes\comfyui-animatediff\models” directory.
4. On the same page, download motion lora models, such as “v2_lora_PanLeft.ckpt”, “v2_lora_PanRight.ckpt” … “v2_lora_ZoomIn.ckpt” and “v2_lora_ZoomOut.ckpt.” There are total eight motion lora models. Put them in the “ComfyUI\custom_nodes\comfyui-animatediff\loras” directory.
5. Go to Stable Diffusion VAE model in Huggingface, download “vae-ft-mse-840000-ema-pruned.safetensors” and put it in the “ComfyUI\models\vae” directory.
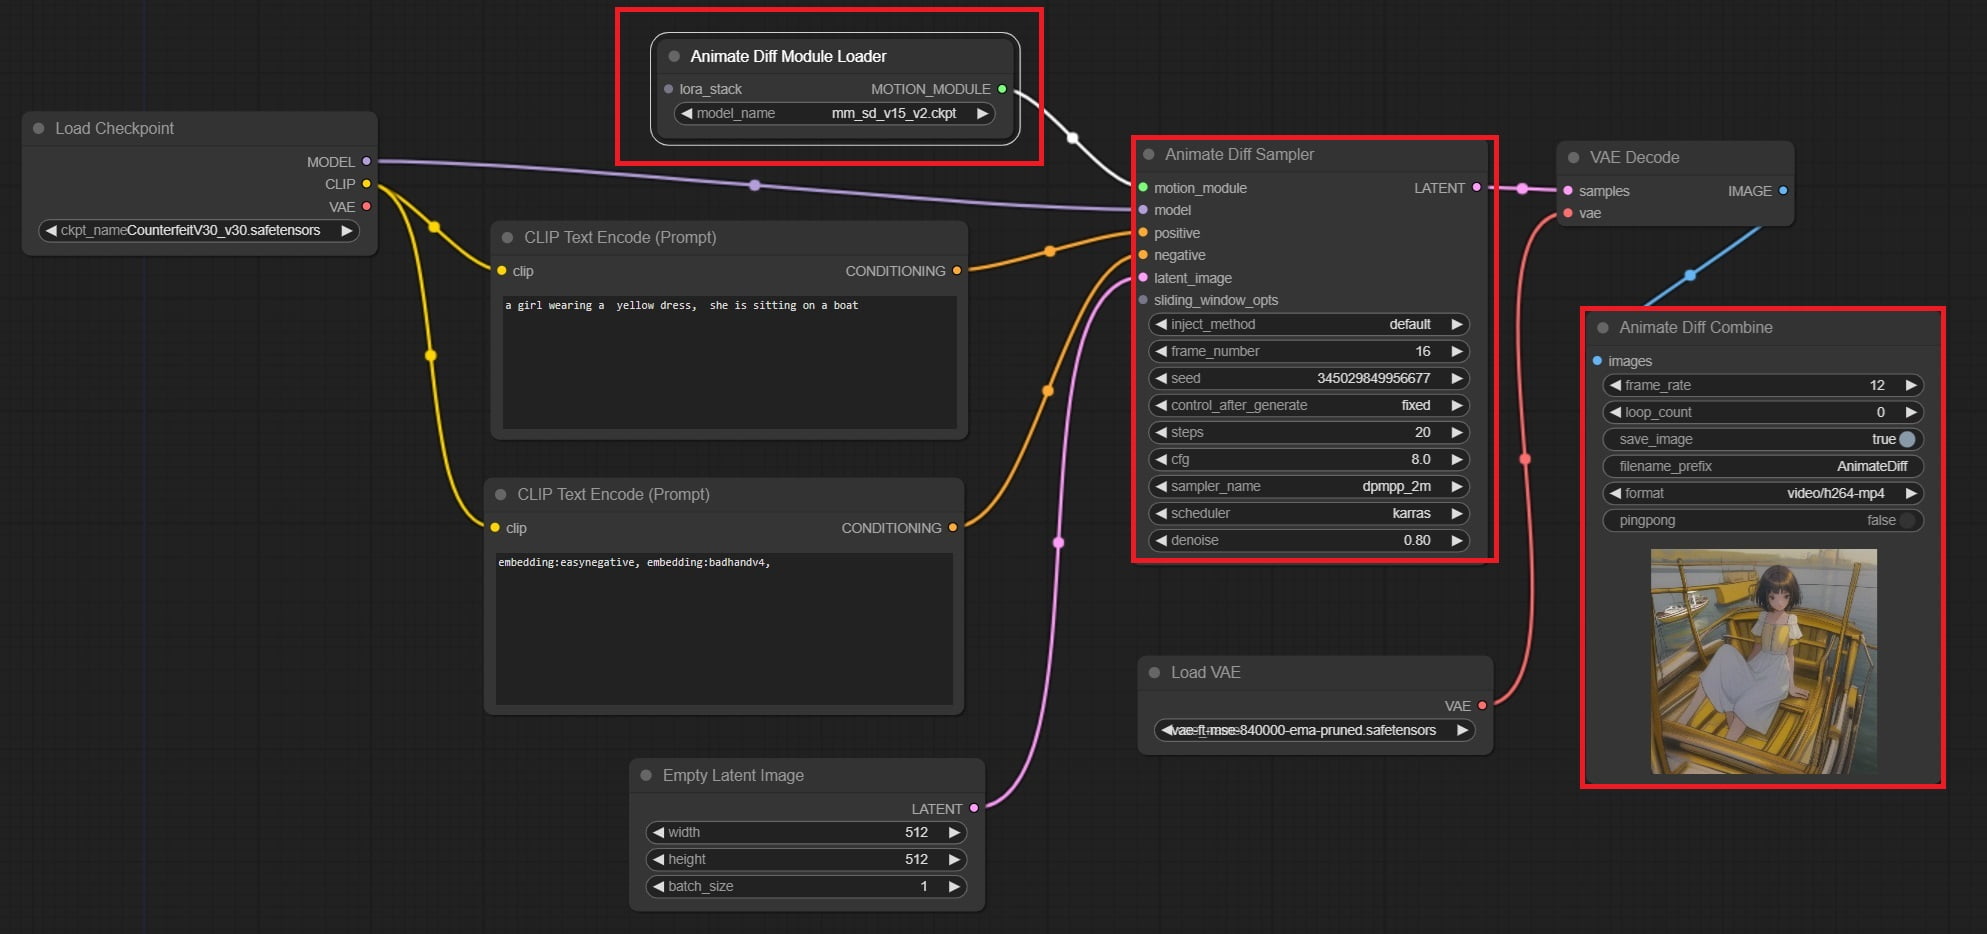
6. To test the installation, go to comfyui-animatediff workflows. In this page, there are a few animatediff workflow examples. Download simple.json.
7. simple.json is a txt2img workflow. Drag simple.json to your ComfyUI in the browser. There are a few nodes used for AnimateDiff (See the image above). They are: Animate Diff Module Loader, Animated Diff Sampler, and Animate Diff Combine. In the Animate Diff Module Loader node, select a motion model, such as “mm_sd_v15_v2.ckpt.”
8. To run the workflow, in the Load Checkpoint node, select a checkpoint in your “ComfyUI\models\checkpoints” directory. In the Load VAE node, select the VAE model you just downloaded. Change the prompt to describe your video.
9. Click the Queue Prompt button to run the workflow. Monitor the progress in the ComfyUI console.
10. When it finishes, a new video shows in the Animate Diff Combine node. The output image is also saved in the “ComfyUI\output” directory. Remember to save your workflow by clicking the Save button in the right panel.
6. Install AnimateDiff-Evolved
AnimateDiff-Evolved is an improved AnimateDiff integration for ComfyUI. It requires the installation of additional customer nodes such as ComfyUI-Advanced-ControlNet and ComfyUI-VideoHelperSuite.
1. Open ComfyUI in a browser at http://127.0.0.1:8188/.
2. Click the Manager button in the right panel. The ComfyUI Manager Menu opens. Click the Customer Nodes Manager button, a window with a list of customer nodes pops up. In this window, search for “Kosinkadink.” There are three custom nodes showing up. They are “ComfyUI-Advanced-ControlNet”, “AnimateDiff Evolved” and “ComfyUI-VidelHelperSuite.” Select all three and Install them. When the installation finishes, click the RESTART to restart ComfyUI.
3. Go to download animatediff motion models, such as “mm_sd_v15_v2.ckpt” and “v3_sd15_mm.ckpt” etc. Put them at “ComfyUI\custom_nodes\ComfyUI-AnimateDiff-Evolved\models” directory.
4. On the same page, download motion lora models, such as “v2_lora_PanLeft.ckpt”, “v2_lora_PanRight.ckpt” … “v2_lora_ZoomIn.ckpt” and “v2_lora_ZoomOut.ckpt.” There are total eight motion lora models. Put them in the “ComfyUI\custom_nodes\ComfyUI-AnimateDiff-Evolved\motion_lora” directory.
5. Go to VAE model page, download “vae-ft-mse-840000-ema-pruned.safetensors” and put it in the “ComfyUI\models\vae” directory.
6. If you haven’t install ControlNet, go to install ControlNet in ComfyUI.
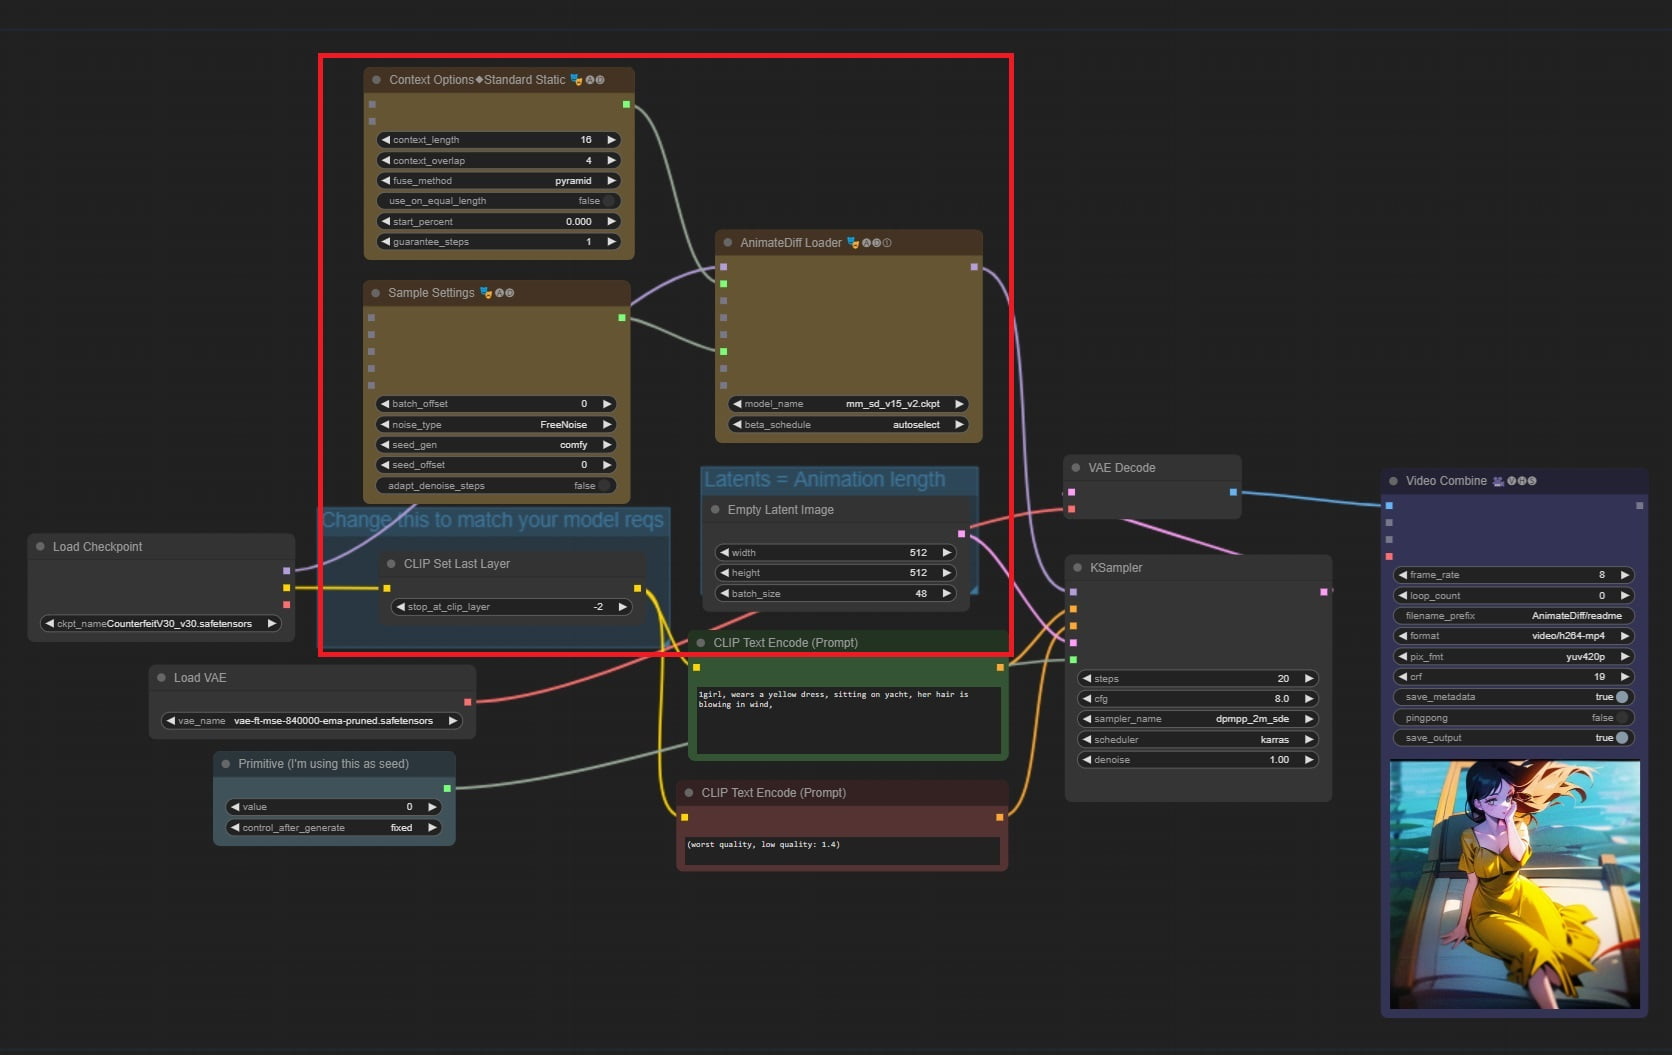
7. To test the installation, go to comfyui-animatediff-evolved samples. In this section, there are many animatediff-evolved workflow examples. Drag one of them, e.g “txt2img – 48 frame animation with 16 context_length,” to your ComfyUI in the browser.
8. Let’s look at the workflow. The animatediff nodes are hightlighed in red (see above image). In the AnimateDiff Loader node, select a motion model, such as “mm_sd_v15_v2.ckpt.”
9. The Context Options node helps to extend the output video to more frames. In the Latents = Animation Length node, the default batch size is 48, which means it will generate 48 frames.
10. To run the workflow, in the Load Checkpoint node, select a checkpoint in your “ComfyUI\models\checkpoints” directory. In the Load VAE node, select the VAE model you downloaded. Change the prompt to describe your video.
11. Click the Queue Prompt button to run the workflow. Monitor the progress in the ComfyUI console.
12. When it finishes, a new video shows in the Video Combine node. The output image is also saved in “ComfyUI\output” directory. Remember to save your workflow by clicking the Save button in the right panel.
Now you have ComfyUI and some important customer models installed, you are ready to run complex workflows.


